Stylish Easter Table Inspo
Easter is all about gathering family and friends together and celebrating with delicious treats, but who said the preparation has to be hard!?
Get into the Spring vibe and set up in style (and simplicity) by following our tips for laying the perfect Easter table.
(Hint: it doesn't have to take hours or cost the earth!)
We'll show you how to create simple, seasonal looks using pops of Spring colour and affordable accessories. Then you can focus on enjoying the holiday with your loved ones.
All you’ll need is:
- 12-18 eggs in small boxes (or more depending on your table size)
- Paints and/or coloured felt tip pens
- Paintbrushes
- Some small pressed flowers or floral-style buttons & pva glue (optional)
- A vase & some fresh Spring flowers
- Chocolate mini eggs in pastels/foil-covered, or some small chocolate bunnies (optional)
How to style your table
1. CREATE YOUR DECORATIONS
Handmade decorations are a wonderful talking piece and these cute painted eggs are a lot of fun to create! This is a brilliant table-setting activity to do with kids, so get them involved in mixing colours and painting, even if it gets a little messy ;)
Choose 3-4 Spring colours as your base - we went for white, pink and peach.
For this process you will need to start by removing the inside of the eggs. Follow these easy steps to help you!
- Step 1: Place a piece of tape over both ends of the egg
- Step 2: Poke a small hole in the top of the egg with a thumbtack or pin
- Step 3: Flip the egg over and and poke a slightly larger hole in the bottom by wiggling the pin around
- Step 4: Blow through the small hole at the top to push the yolk out of the bottom
- Step 5: Rinse the empty shells and let them dry overnight
Mix and match your eggs by painting them in different ways, for example, you might want to leave some of them white and just gently glue some pressed flowers or small buttons on. For others, you might want to paint the egg completely pink and draw on a floral design with felt-tip pen (once the paint has dried!), it's up to you! (Check out our image below for inspiration.)
Leave a few of them as plain colours or in their original state to add to your flower vase later.
Keep your egg boxes and paint them in matching colours (perhaps white or pink), and leave them to dry.

2. STYLE YOUR PLACE SETTINGS
While your decorations are drying, it's time to lay your table. To ensure your decorations stand out, go for a muted palette with your place settings. Get the look by layering our Ivory Braid plates with some green ceramic bread plates, and pair with our Natural Bistro cutlery and gorgeous Alpine Jewel tumblers to continue the organic, nature-based look.
Natural linen napkins work really well with this look and you can add a pop of colour by tying them with a cut flower or satin ribbon instead of a napkin ring.

3. DRESS YOUR TABLE
Delicately place your finished decorated eggs around your place settings (away from the edges of the table!), either on their own or using your painted egg boxes. Create an eclectic look with the egg boxes by only using 2 of the sections of each holder for eggs and filling the rest with a handful of mini eggs, or a couple of fresh flower heads (check out the image below).
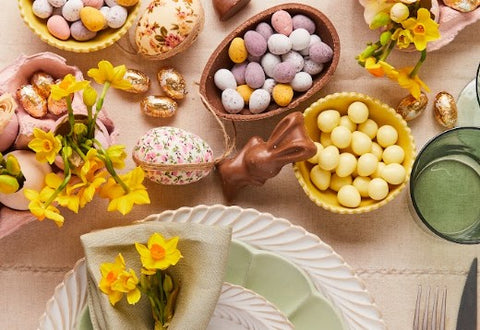
For some post-dinner table nibbles, take some small dip-style serving bowls, or half an Easter egg and fill them with a selection of mini eggs placing those on the table too. Sprinkle a few foil-covered loose eggs across the table for some added sparkle.
4. FINISH WITH FLORALS
Don't forget to crown your table with some beautiful flowers (daffodils and tulips are affordable and in-season right now). Place your flowers in a small-medium sized vase and gently arrange a few of your plain-coloured eggs around them. Stack the eggs gradually so you end up with about 3 layers. We recommend one vase as a centrepiece for a smaller table, or 2-3 for bigger gatherings.

For some final finishing touches add a cheeky little chocolate bunny to each place setting and add a small daffodil to each napkin for a burst of sunshine.
From all of us here at The Social Kitchen, Happy Easter!
We’d love to hear how your Easter get-together goes. Let us know in the comments!